Text And Localization – First Look

Text, text, text! There’s so much text in Daggerfall – from “Rat just died” all the way up to multi-page books. Before it’s possible to tackle many gameplay elements, something must be done about all this text. All the better if the text engine provides localization features at the same time.

Rather than start from scratch, I have integrated the excellent free Unity asset Smart Localization into Daggerfall Tools for Unity. On this solid foundation, I’m building import tools to convert Daggerfall’s various text sources into a format that can be easily localized and consumed at runtime.

Let’s take a look at the basic workflow. Everything starts with creating a “Localization Workspace” in your project Assets. By the way, it’s possible to work on translations without Unity installed, more on this towards the end.

SmartLocalizationSetup

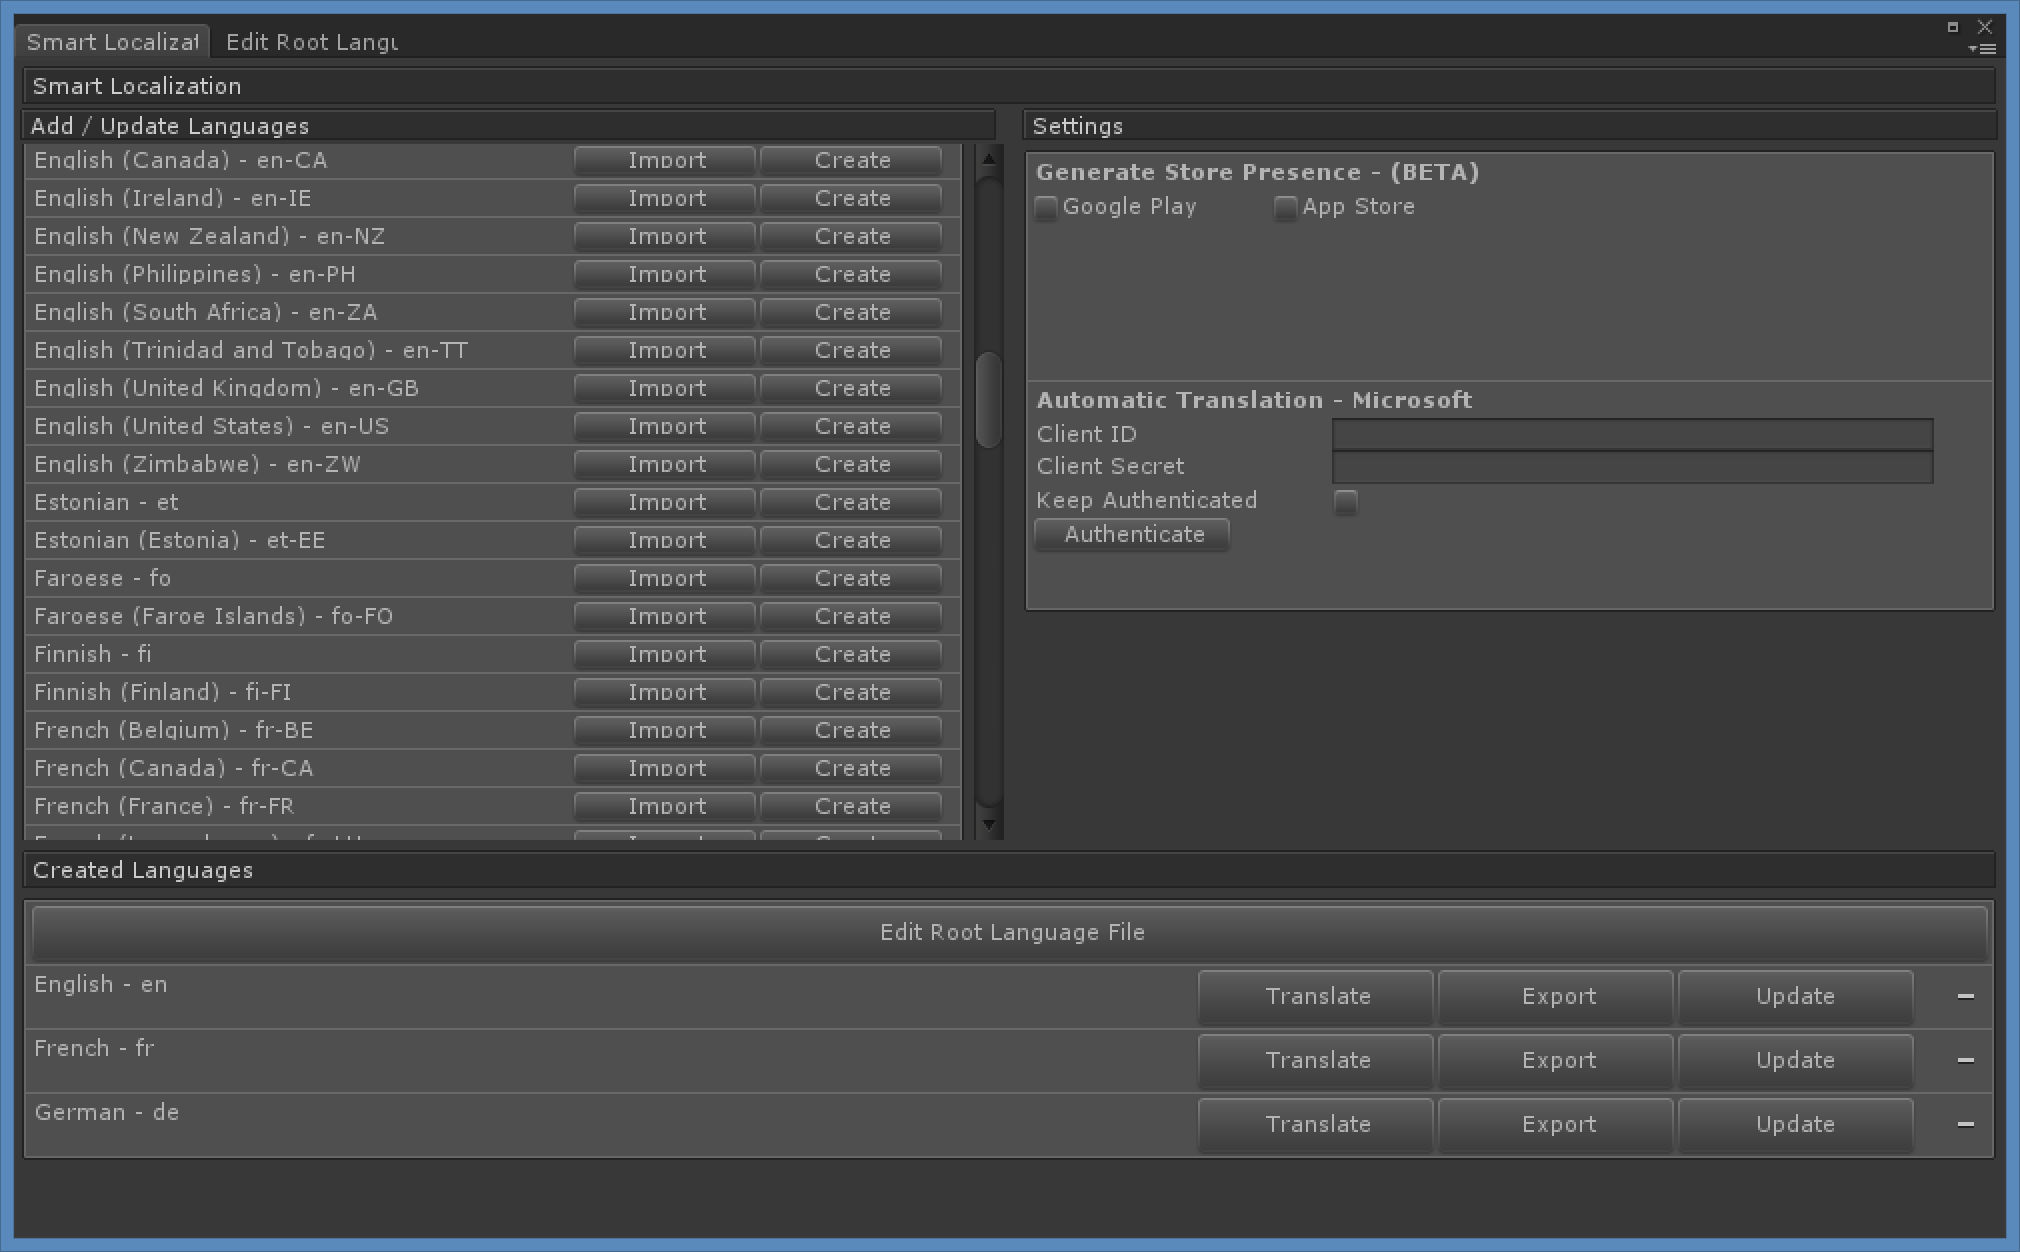
What you see above is the Smart Localization workspace. I have already created 3 languages for English – en, French – fr, and German – de. There is also a Root Language File, which needs a bit more explanation.

The Root Language is a database of native key/object pairs that can be morphed into other supported languages. In addition to strings, the Root Language also supports images, sounds, and other game objects.

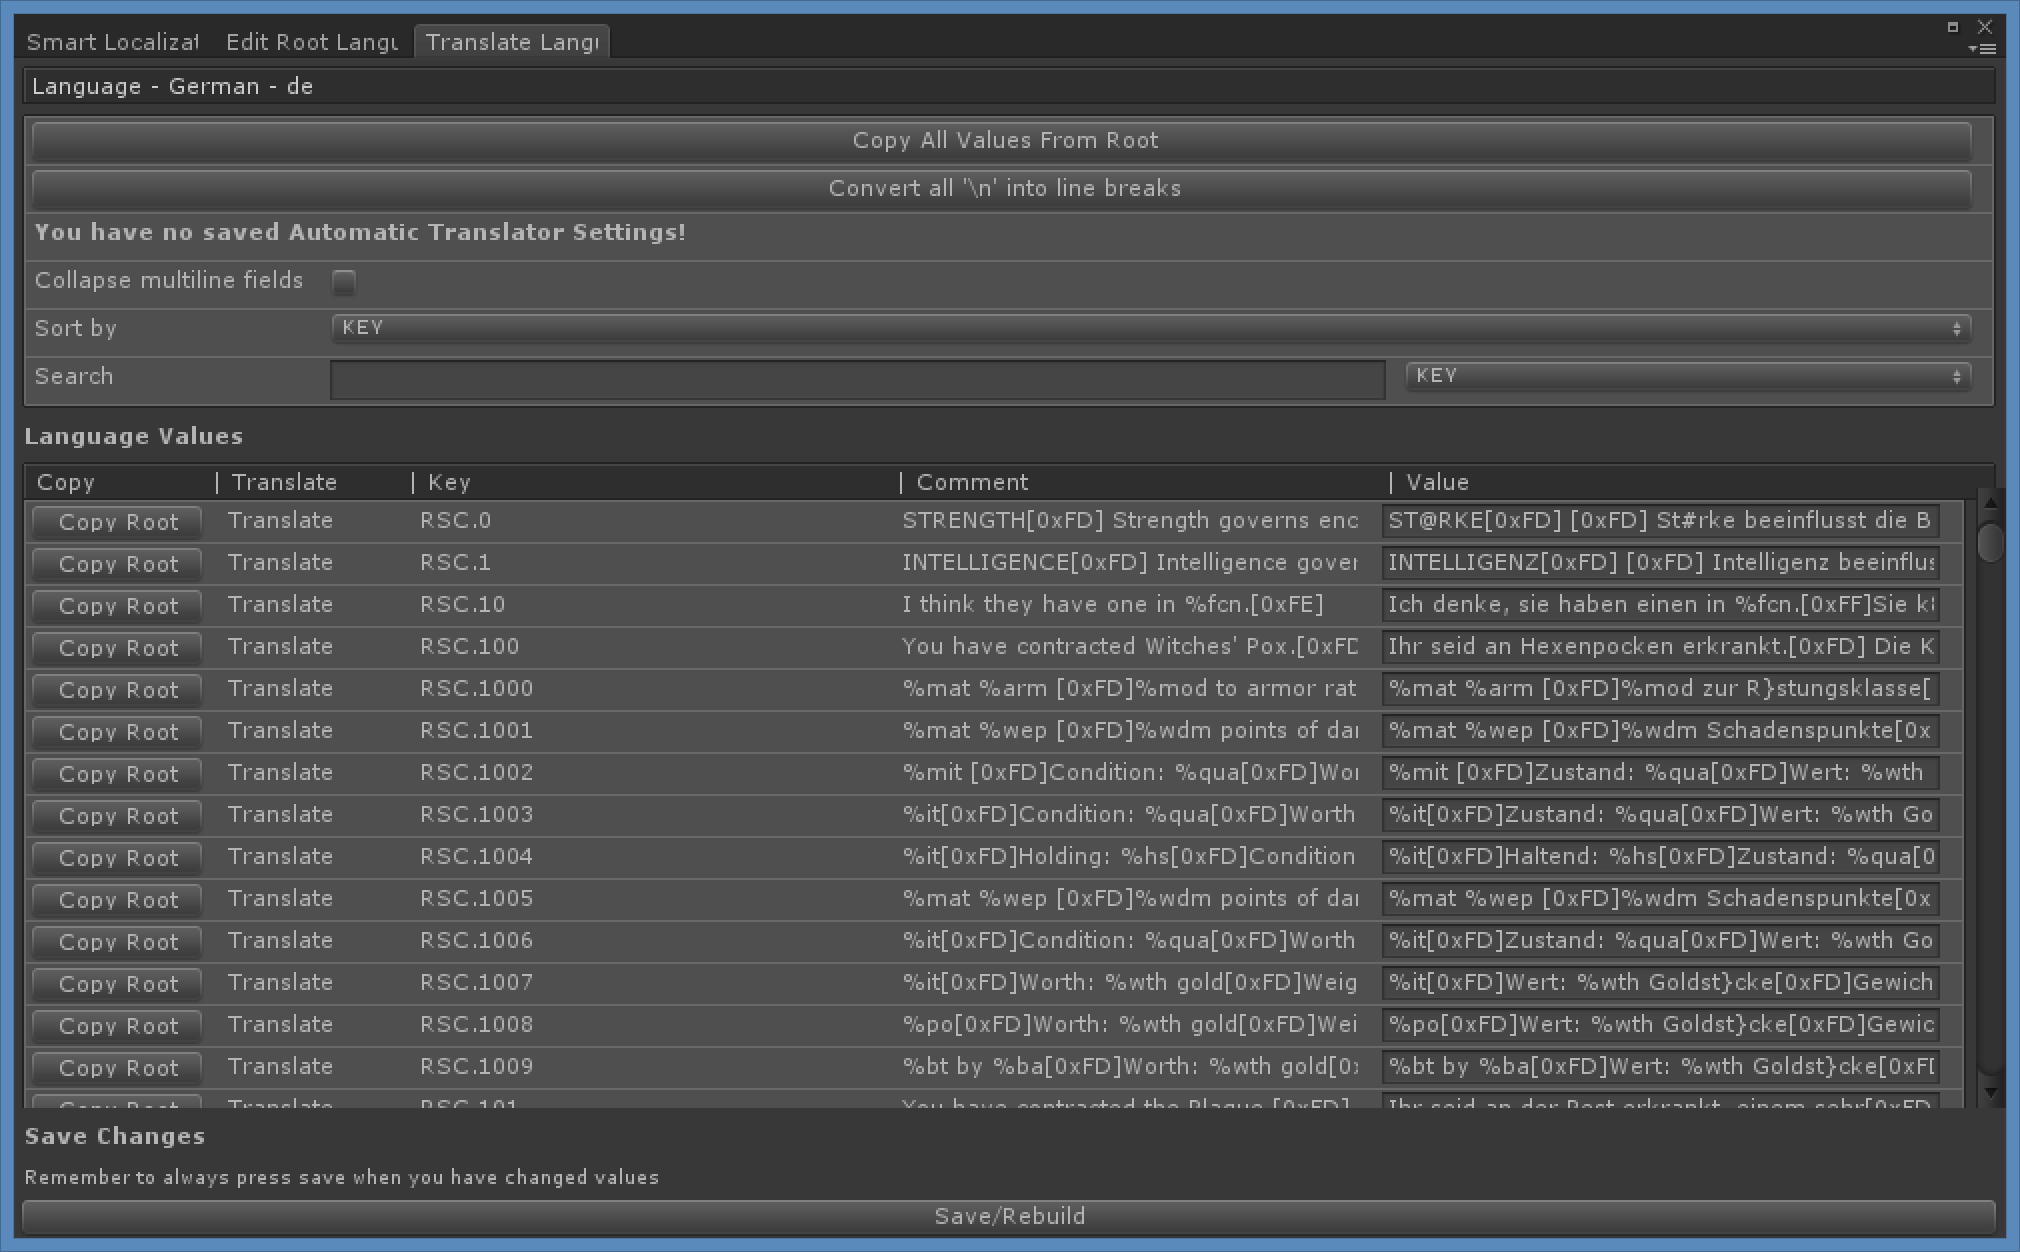
I am writing one-click importers that transfer text data out of Daggerfall’s various files (even the .exe) into their own text namespace. See below for an example after importing the contents of TEXT.RSC.

RootKeyImportFromDaggerfall

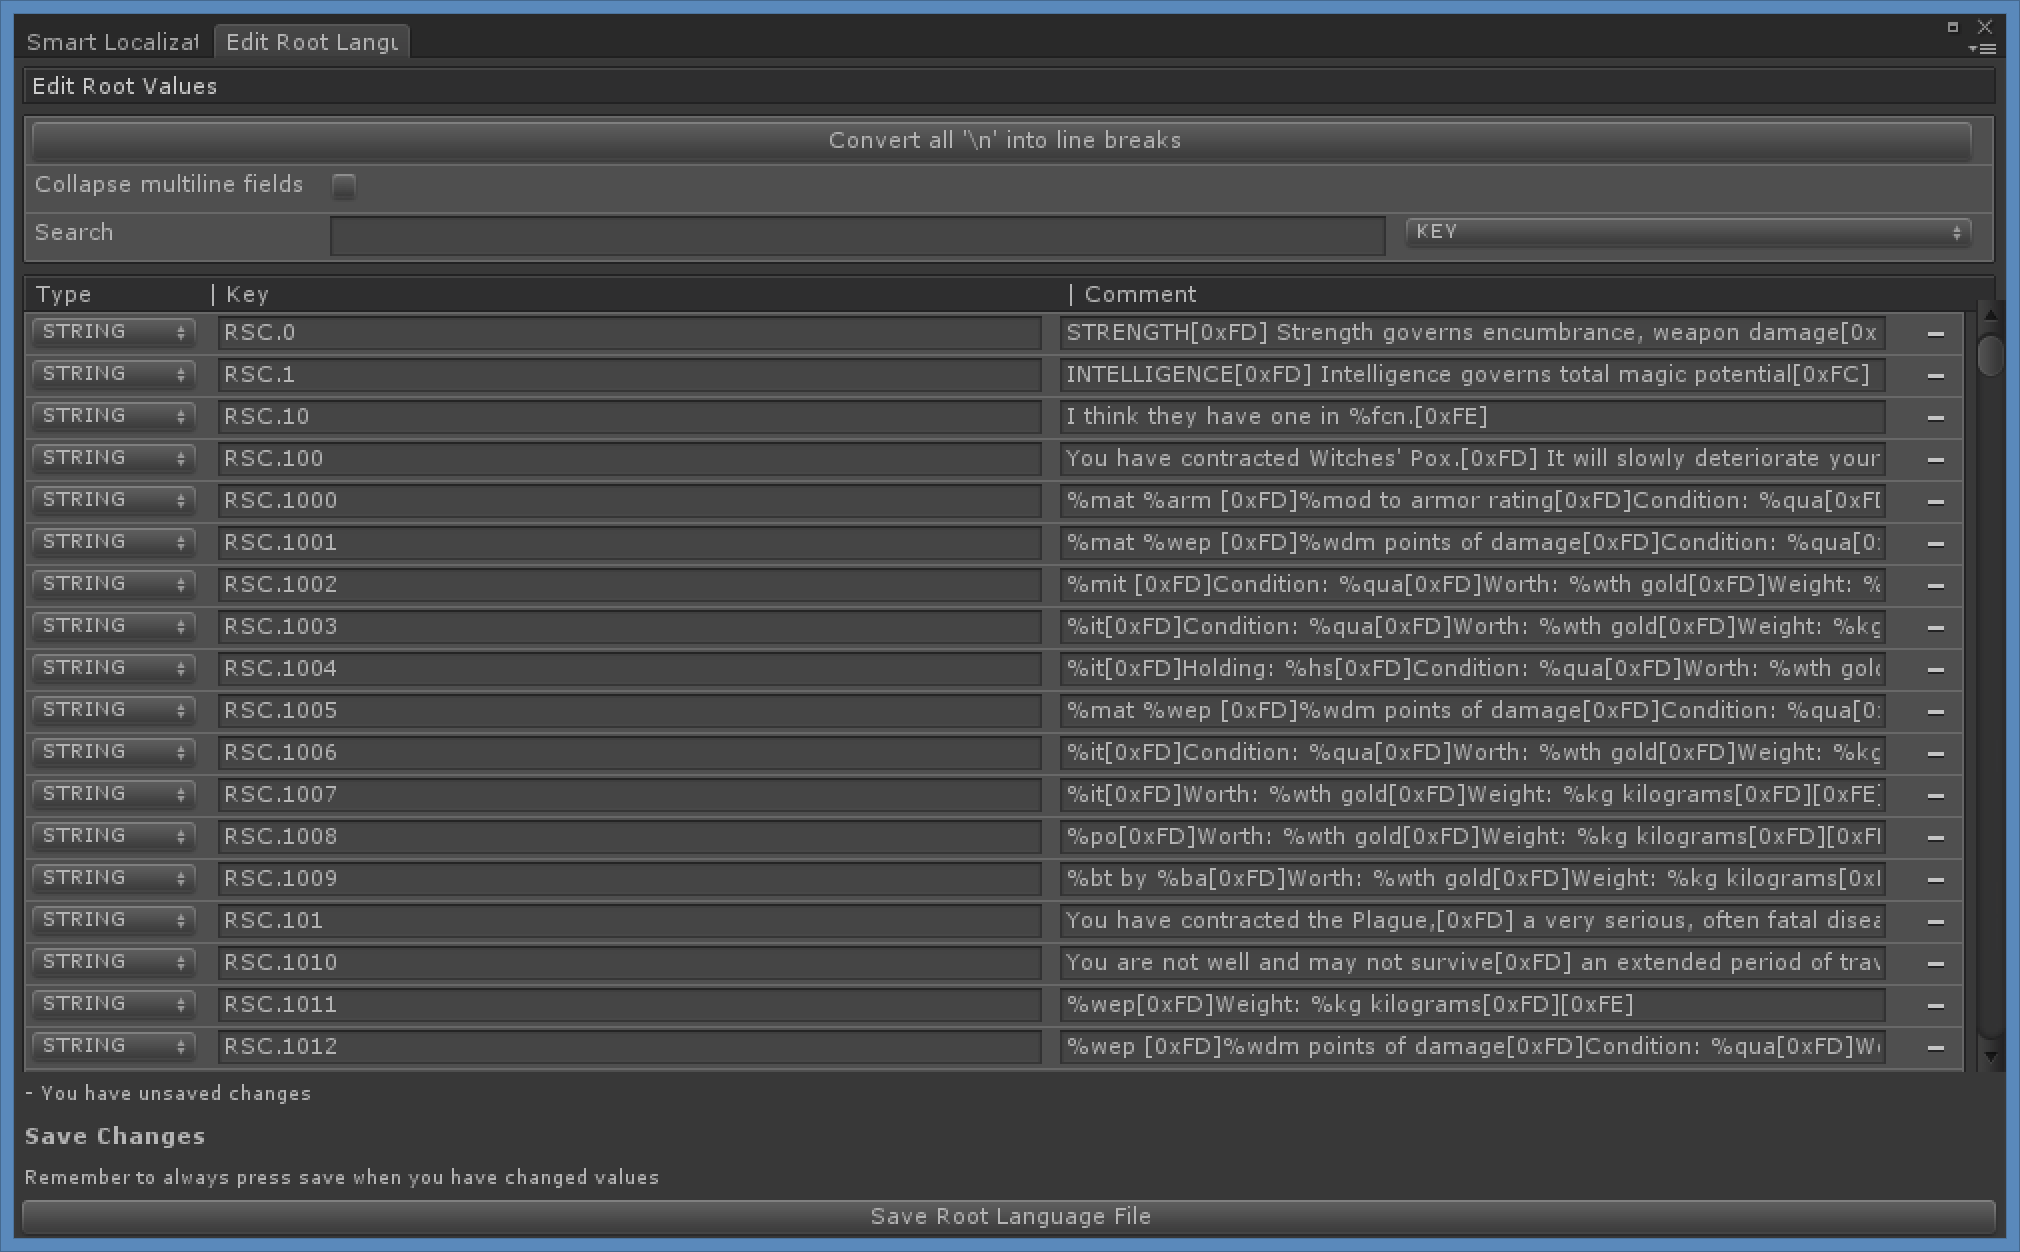
There’s a fair bit going on here, so I’ll break down all the parts.

Type is the type of asset being worked with. These are all STRING for now, but GAME_OBJECT, AUDIO, and TEXTURE are also supported.

Key is the unique key for this resource. As we’re importing from Daggerfall, the tool maintains each unique key in its own namespace. RSC means that TEXT.RSC was the source and the following digits are the unique ID for that text record. Each distinct resource will have its own three-letter namespace (BOK, IMG, SND, etc.) and unique ID.

Comment is the actual value, or contents, of that record. Anyone that has worked with Daggerfall’s text data will be familiar with the % codes. What’s a little different are how the control bytes are parsed into text format, for example [0xFD] for end of line. This is done because the control bytes are not valid characters for XML (which is how everything is saved to disk) and they are not generally human readable. The [0x00] format makes it very clear where control bytes are used and simple for a human to edit. It’s also trivial to parse these back into byte format.

A little more on those control bytes for anyone unfamiliar with them. They are basically for TTY-styled formatting. They control things like text position, justification, and font, and are very specific to the native Daggerfall GUI at 320×200 resolution. It’s very likely that future developers will prefer not to use the control bytes for their modern scalable UI. However, I pass through the control bytes exactly as-is and its up to the end developer how they wish to use them. If you would like read more about Daggerfall’s text then this article would be of use.

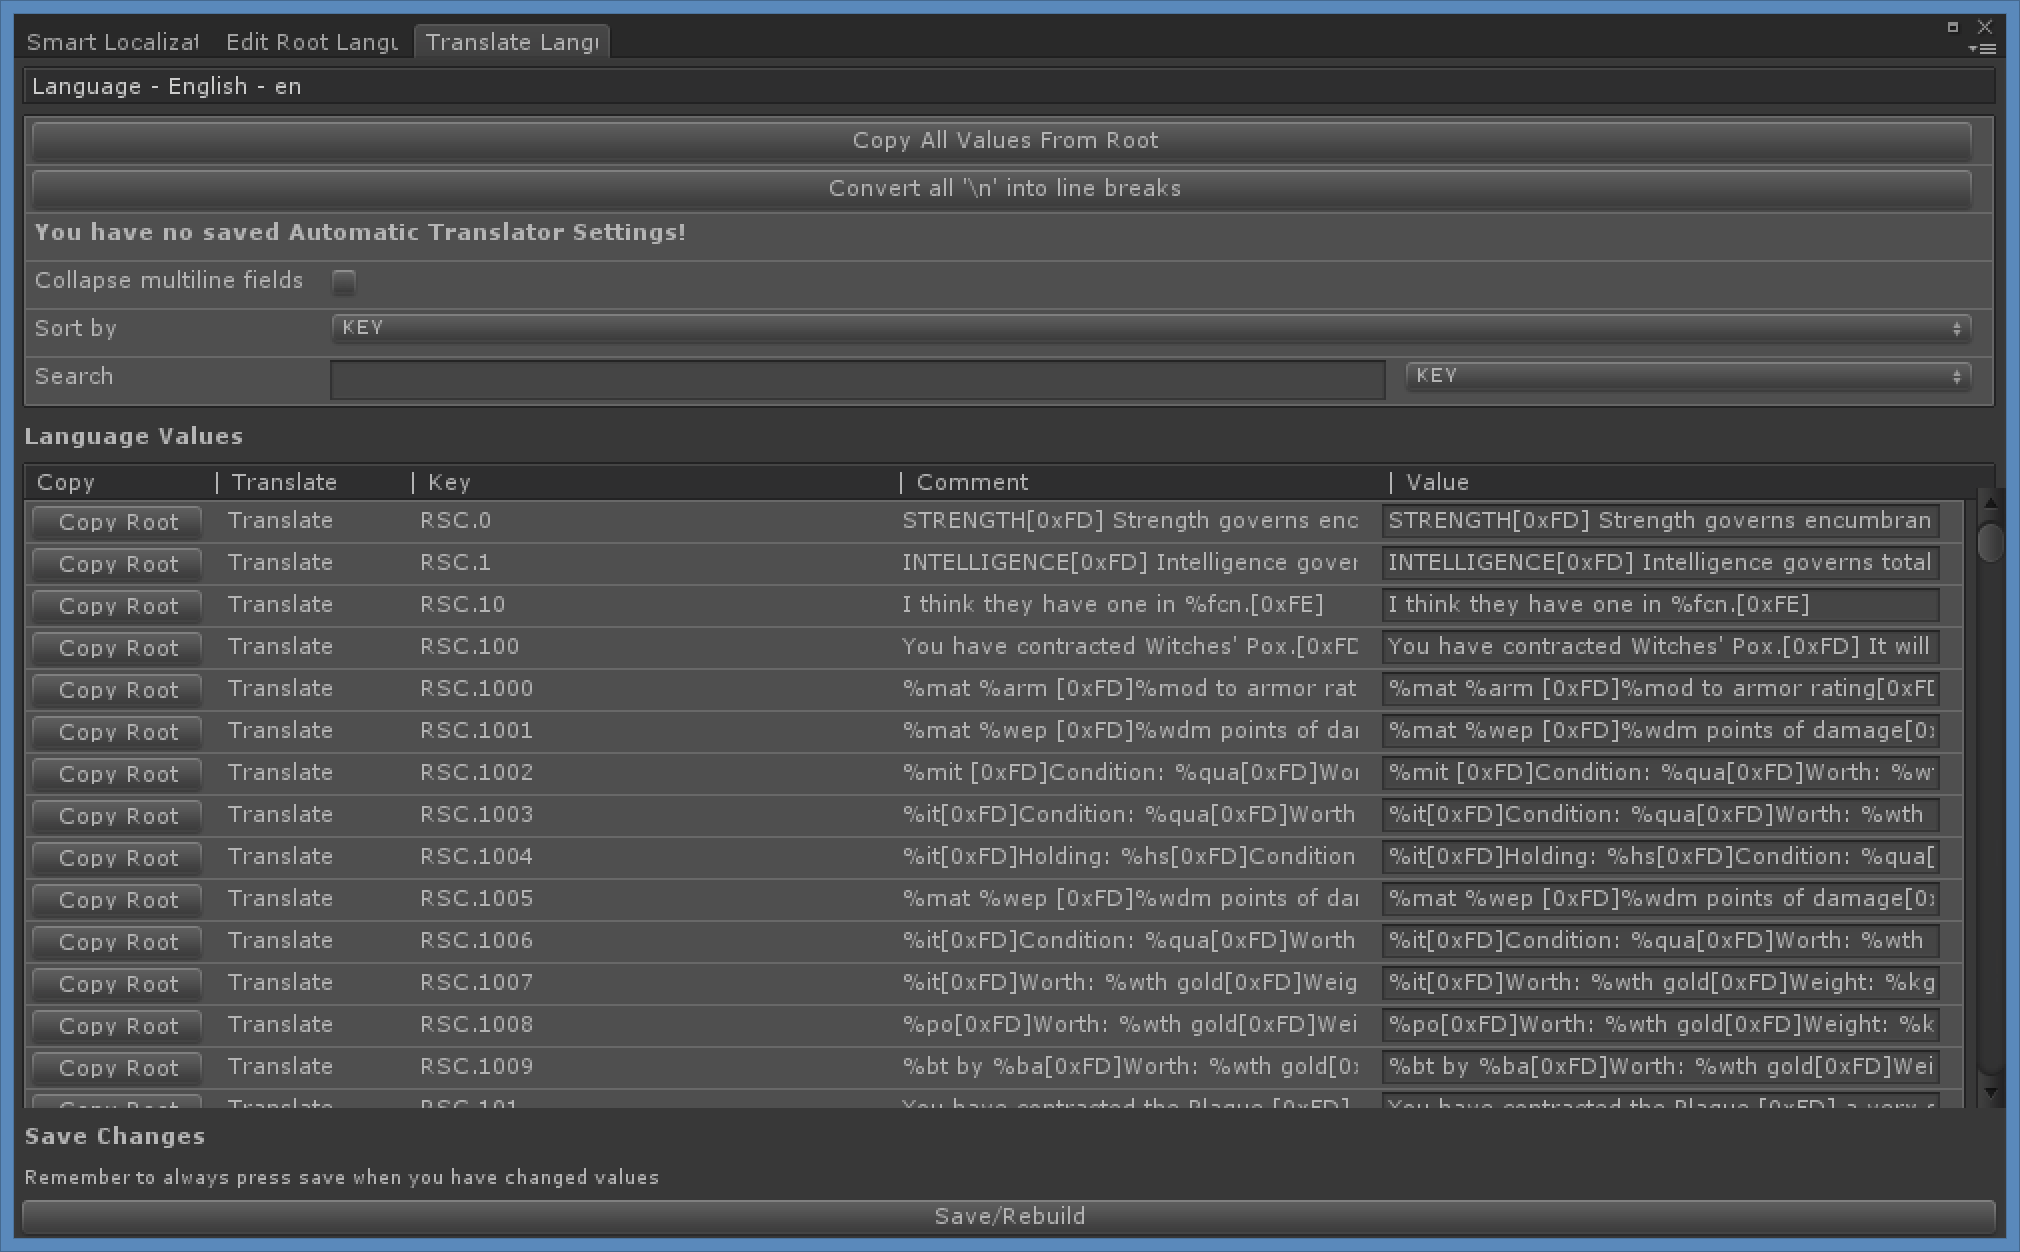
Once the Root Lanuage is ready, it’s time to create our translations. As the text is already in English – en it’s just a simple matter of opening that language and copying all values from Root.

TranslationEN

Now the great thing about Smart Localization is that it supports CSV import/export. This means you can export out your language data to CSV file to edit in Excel or similar tool.

SpreadsheetEN

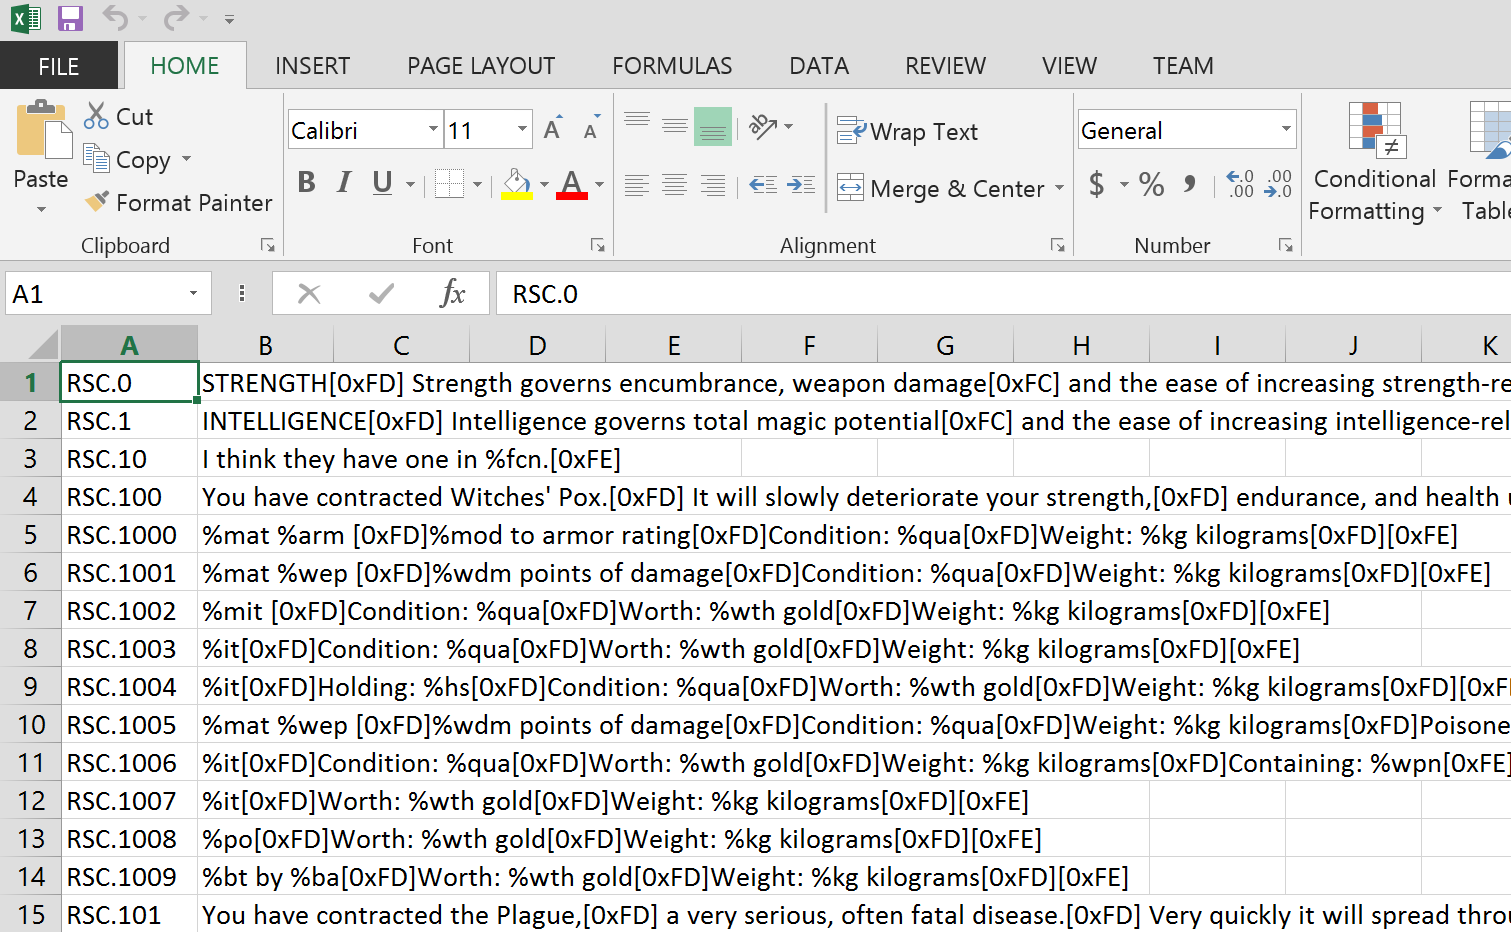
Because everything is uniquely keyed, translation teams can build “master” CSV files that implementors can use to quickly add/update languages in their projects. For example, below is the CSV for German – de from their TEXT.RSC file.

SpreadsheetDE

And then imported into Unity ready to use in a game project.

TranslationDE

One issue with existing translations is that localization teams have needed to squeeze more complicated character sets down into Daggerfall’s 8-bit format. The good news is this is no longer necessary – you are no longer limited by Daggerfall’s engine. The bad news is that a lot of text will probably need to be rewritten for true character set translations for modern platforms. I will work with international Daggerfall fans to ensure they can use native character sets in the translation tool chain.

So we can create a giant resource database and spin-off various translations. How does this get used in a game project?

Accessing localized resources is very easy. For example, to retrieve a localized text string above, you would use the following code. Other resources are just as easy.

string textValue = LanguageManager.Instance.GetTextValue("RSC.1004");

As the native IDs are preserved, it will be easy for upstream developers to call for the correct translations as linked from quests and elsewhere. You can also add custom values for your own project, just need to give them a unique key.

Fell free to hit me up in the comments or via email if you have any question.

Improved Terrain Tiling

To date, I have used a brute-force approach when tiling textures in cities and terrains. Each texture tile is mapped to a quad of vertices where each corner describes a UV coordinate allowing its texture to be drawn normally, rotated, flipped, or both rotated and flipped. This saves a great deal of texture space as only one version of texture is required to achieve four variations.

While it saves on texture memory (great for a 1996 game), this system has some inherent problems, not least of which is the number of vertices being used. For example, a full 8×8 block terrain has a total of 128×128 quad tiles with 4 vertices each. That’s a total of 65536 vertices just to handle the ground plane of a big city like Daggerfall or Wayrest. This is larger than Unity’s maximum mesh size, so everything needs to be split up into chunks. As cities are completely flat, wouldn’t it be great if we could just render all these tiles onto a single quad, using only 4 vertices for an entire city?

Happily, this is not only possible, we can solve a few other problems with tiled textures in the process. All through the magic of custom shaders.

The first step is to change how the ground atlas is stored. Rather than just reference a single texture and modify using UVs, we’re going to pre-transform each texture in all 4 possible configurations (normal, rotated, flipped, rotated+flipped). This removes the need for UV changes and saves time in the fragment shader, and allows for some extra packing to happen as you’ll see shortly. The new tile set atlas looks like below (note that Unity texture [0,0] is bottom-left).

Atlas1

In order to reference these tiles in the fragment shader, we also create a tile map texture. This texture packs an index into the red channel that is basically a number 0-255 corresponding to a tile in the atlas above. This texture must be point-sampled to ensure no corruption of indices occurs. The tile map for Daggerfall city is below.

Tilemap

Now the shader has an atlas of tiles and indices referencing which tile to use. The following bit of code will read index from tile map then render out correct texture tile from the atlas.

int index = tex2D(_TilemapTex, i.texcoord0).x * _MaxIndex;
int xpos = index % _TilesetDim;
int ypos = index / _TilesetDim;
float2 uv = float2(xpos, ypos) / _TilesetDim;
float xoffset = frac(i.texcoord0.x * _TilemapDim) / _TilesetDim;
float yoffset = frac(i.texcoord0.y * _TilemapDim) / _TilesetDim;
uv += float2(xoffset, yoffset);
return tex2D(_MainTex, uv);

The result is a fully tiled city quad using just 4 vertices.

TilemapInAction

This works great, and it’s fast. If we were just using point filtering with no mipmaps, our job would be done already. Unfortunately linear filtering adds one set of problems and mipmaps add another. The first problem is texture colours bleeding in from adjacent tiles due to how linear filtering works. Image below demonstrates problem, note the dirt texture being sample at edge of water.

Bleeding

There are a few of ways to fix this, but one of the most robust is to manually wrap textures around to their opposite side in the atlas. This means that when the linear filter samples outside the tile area, texture wrapping will be simulated. The new atlas shows this concept with each tile wrapped 50% on all sides. Note: This solution works for tiling textures, but not for non-tiling textures where texture clamping needs to be simulated instead. The atlas generator is yet to support both wrapped and clamped tiles.

Atlas2

With a new atlas format, our fragment shader needs updating to sample interior part of each texture.

// Get offset to tile in atlas
int index = tex2D(_TilemapTex, i.texcoord0).x * _MaxIndex;
int xpos = index % _TilesetDim;
int ypos = index / _TilesetDim;
float2 uv = float2(xpos, ypos) / _TilesetDim;

// Offset to fragment position inside tile
float xoffset = frac(i.texcoord0.x * _TilemapDim) / _GutterSize;
float yoffset = frac(i.texcoord0.y * _TilemapDim) / _GutterSize;
uv += float2(xoffset, yoffset) + _GutterSize / _AtlasSize;

// Return fragment
return tex2D(_MainTex, uv);

These additions fix linear sampling to all but remove bleeding for tiling textures. Compare this image to the earlier version.

BleedingFixed

With texture bleeding taken care of, the next challenge is dealing with mipmaps. The graphics card has no understanding of our atlas, so tile wrapping makes it sample from the wrong mip level, which creates a whole new problem with cracks as shown below (you might need to open image to full size to see the cracking discussed).

MipMapCracks

Fixing this problem requires manually calculating the mip level in fragment shader. Fortunately there’s a lot of references online for dealing with this. Rather than just naively return the texture sample using tex2d, we need to use tex2dlod instead. Below is change to final line of code.

// Manually set mip level and return fragment
float mipLevel = GetMipLevel(i.texcoord0, _AtlasSize);
return tex2Dlod(_MainTex, float4(uv.xy, 0, mipLevel));

And the GetMipLevel() function.

float GetMipLevel(float2 iUV, float2 iTextureSize)
{
	float2 dx = ddx(iUV * iTextureSize.x);
	float2 dy = ddy(iUV * iTextureSize.y);
	float d = max(dot(dx, dx), dot(dy,dy));
	return 0.5 * log2(d);
}

With this new code, our mip cracking problem has vanished.

MipMapCracksFixed

And there we have it. A super-fast method of tile mapping from an atlas which defeats both texture bleeding and mip sampling problems, and only needs a single quad mesh.

There’s still more work to do, mainly around atlas generation. I need to handle wrapped tiles and clamped tiles differently, and manually pack mip levels to improve overall quality. I will get back to this in the new year with my performance review. On the subject of performance, these concepts can be expanded to reduce draw calls for the terrain system and city environments. This is just the first spoke in a big wheel of optimizations.

This last screenshot is of the material inside Unity editor, which shows how everything hangs together.

ShaderInEditor

References

I could not have pulled this off without the help of several people much smarter than myself. All the links below were used in formulating this solution.

Connor Hollis – Fast Tilemap Shader
http://connorhollis.com/fast-tilemap-shader/

IceFall Games – Terrain Engine
http://mtnphil.wordpress.com/2011/09/22/terrain-engine/

nVidia – Improve Batching Using Texture Atlasing
https://developer.nvidia.com/sites/default/files/akamai/tools/files/Texture_Atlas_Whitepaper.pdf

0 FPS – Texture atlases wrapping and mip-mapping
http://0fps.net/2013/07/09/texture-atlases-wrapping-and-mip-mapping/

Streaming World – Part 2

In the first part of this series, we looked at how the world in Daggerfall is constructed from multiple 1000×500 pixel maps, and how procedural techniques can be applied to add more fine detail to Daggerfall’s height map.

This article shows how continuous height map data generated by world readers is injected into scene as continuous meshed terrain and how terrain is landscaped into flat areas for cities.

First up, I have chosen not to use Unity’s native terrain system. There are several reasons for this, but chiefly is that Daggerfall terrain textures work very differently from Unity. In Unity (like most modern 3D engines) the terrain is textured using a splat map – a special texture which determines how detail textures are to be blended at every vertex. Daggerfall on the other hand uses a grid of quads textured from a selection of 56 tiles. These tiles are earth, sand, grass, stone, and road with hand-painted transitions between most states.

TerrainTextureTiles

Above is the temperate terrain set as viewed from Daggerfall Imaging 2. There is one complete set of 56 tiles per climate base (desert, temperate, mountain, swamp) with one variant for snow and another for rain. To save texture space, these tiles also use UV modification to be rotated, flipped, or both rotated and flipped where required.

In order for the terrain to blend seamlessly from wilderness into city tiles, it becomes necessary to build a custom terrain system which understands how Daggerfall works. This unfortunately excludes the default Unity terrain. The code is modular however, so you can always replace part or all of my terrain system with something else.

With the decision made to create a Daggerfall-like terrain system, the next stage is to transform raw height data into streaming mesh samples and format ground for locations.

The first step of this journey was actually implemented a few weeks back in the 1.1 update. See article Time & Space and More for details about PlayerGPS and WorldTime components. Suffice to say, the toolset already has a good understanding of where the player is in the world and what locations are nearby. I will copy an image from the time and space article here as it pertains to world streaming.

WorldStreaming

Above is a snapshot of the world in pure numerical form. Each of these tiles represents a Map Pixel (discussed in part 1), which is the size of a full-sized city. The player is standing at the origin of Daggerfall city at map pixel 207, 213. In the immediate vicinity are Ripwych Commons to the north-west (206, 212) and Copperfield Manor to the south (207, 214). Keep an eye on them, as we’ll be seeing more of them soon.

At a high level, the StreamingWorld component stores data much like the above. It keeps track of a small bubble of world space around player in a 2D array. As the player moves, tiles are shifted up, down, left, or right in the array (based on direction player is moving). New map pixels are loaded as required and everything is occasionally snapped back to near origin, which avoids precision errors at extreme limits of the map. From the player’s perspective, they are walking endlessly into the distance. In reality, they are on a terrain treadmill.

Inside each of these map pixels a DaggerfallTerrain object is created for the entire area. This is generated procedurally from Daggerfall’s height map combined with smooth noise to add small details. This terrain is then broken up into several DaggerfallTerrainChunk objects, which represent the actual mesh objects and colliders for the player to see and walk on.

The edge vertices and normals of each adjacent terrain are stitched together to create a nice continuous terrain. The next screenshot shows a 3×3 terrain area, once again centred on Daggerfall, with the tiling texture system discussed above. Right now it is just set to grass. I also have turned up the noise scale to make the deformations a little more interesting.

StartingTerrain

The locations are there in memory, but nothing is being drawn yet. Before we can insert locations, some foundations must be laid. First come the appropriate texture tiles. Unlike the earlier screenshot, the locations are centred inside their map pixel. Daggerfall city is in the middle, Copperfield Manor is to the south, and Ripwych Commons is just barely visible to the north-west.

LocationGroundTextures


Now location textures are in the right place, but there’s a big problem – cities in Daggerfall need a flat plane to sit on. This raises two questions. What level should the terrain be flattened to and how can everything be smoothed out cleanly?

I evaluated several different methods for selecting city level. The below screenshot shows a few of them without any smoothing.

FlattenVariants

I didn’t like the highest point as it made everything feel too raised. The average is pretty good as the city is leveled evenly in between all deformations, but I rejected it also as another pass was required to determine average elevation after applying noise. World height was very cheap to obtain but sometimes felt a little too high or too low. I ended up settling on median bilinear height (from the map reader), which is also very cheap and consistently landed somewhere between the world height and true average. So that’s the level I went with.

The next stage was to blend the flat areas into the random terrain. Interestingly, even full-sized cities like Daggerfall do not really fill their entire map pixel. They have a band of 14 tiles around the outside to use as blend space. These even have special index (>55) to indicate not to use RMB-defined tiles and instead blend with terrain.

The blending process gave me serious headaches for a few days. I tried several different methods of blending heights but none of them gave me a perfect transition from the rectangular city area all the way to edge of terrain. In the end, I created a system of building scale maps with linear rolloff from edge of city to edge of terrain. This uses linear interpolation for the straight rects and bilinear in the corner rects to keep everything smooth.

What is important is the scale is 0 all the way around terrain bounds and smoothly reaches 1 at the location bounds. Drawing the scale map for Copperfield Manor looks like the following. Each of the points below represents the blend weight for random terrain vs level terrain. The further out from the centre rect, the more influence random terrain will have. It looks similar to a pure radial falloff, but if you look carefully you will notice everything converges on a rectangular area, not a single point as would be the case with radial.

ScaleMap

Applying the scale map gives us a nice smooth transition from flat area into random terrain. The terrain features can still express themselves, but the transition feels natural and remains completely walkable even with lots of noise.

SmoothedTerrain

From here, it’s a simple matter of plopping down locations where needed and let the player go exploring.

The next part of this series will be about enhancing details of terrain. I will discuss adding textures outside of cities, improving elevation noise, and adding trees and other wilderness flats.

Streaming World – Part 1

For the last week or so, I’ve been knuckling down on creating a fully streaming overworld in Daggerfall Tools for Unity. If you’re not sure what I aim to accomplish, here’s a brief overview of how I want this to work from the Unity Editor.

  1. Setup DaggerfallUnity singleton as normal.
  2. Add prefab StreamingWorld into scene hierarchy.
  3. Add prefab PlayerAdvanced into scene hierarchy.
  4. Set player virtual position in PlayerGPS and virtual time in WorldTime.
  5. Hit Play and explore entire Illiac Bay, entering any building, any dungeon, and experiencing full day/night cycle with climate and seasons.

In many ways, I’m already very close to this goal. The tools have procedural loading of cities and dungeons, virtual time and space, climates and seasons, day and night, interiors and exteriors, and more. What’s missing is a full terrain setup and intelligent loading/unloading of blocks as player traverses the world.

You can probably imagine what a huge job this is. While I am working very quickly towards this goal, it will be another 3-4 weeks before it all comes together in a state that I’m happy with. To maintain regular updates over that time, I will split news on my progress over multiple articles.

In this first article, let’s take a look at Daggerfall’s height map and how it translates into useful terrain.

Similar to the 1000×500 maps found in POLITIC.PAK and CLIMATE.PAK, Daggerfall also stores a 1000×500 elevation map in WOODS.WLD. Here’s a grayscale dump of that data (click for full size).

HeightmapFull

You can also see a nice false-colour version of this map here.

Like most height maps, dark areas are low elevations (values of 2 or less are water) and bright areas are high elevations. Daggerfall also stores a noise map in WOODS.WLD, which I’m not going to talk about as I plan to use a better method of noise generation.

To better understand the scale of this data, here is a zoomed-in 10×8 sample grabbed from along the northern coastline (I have brightened image so individual points are easier to make out). Each of the below squares represents a single “map pixel”, equivalent to one full-sized city like Daggerfall or Wayrest. If you measure the time it takes to cross from one side of Wayrest to the other, it would take 10x that amount of time to cross the below sample west-to-east.

HeightmapZoomOriginal

Once the scale is understood, it becomes apparent there’s not much height data here considering the actual size of terrain represented. This is why Daggerfall’s terrain is mostly flat. It’s stretching a single height sample over a huge area then modulating that with a little noise. Sometimes you can fluke a nice bit of terrain, but it’s very rare. On the whole, the overworld in Daggerfall is very flat and bland.

To improve this situation, there needs to exist more data in between height samples above. This new data must be quick to sample, use very little memory, and create a continuous grade between samples with plenty of interesting variety. To accomplish this, I am combining a few basic techniques.

The first problem to solve is the rate of elevation change between map pixels. It’s incredibly boring to have a huge flat area abruptly stepping up or down into yet another huge flat area. Our baseline needs to be a nice continuous elevation change from sample-to-sample.

I have added a new API method called GetHeightBilinear(). This quickly samples any point in the 1000×500 map with any number of bilinear interpolations between samples. The result is a much smoother overworld full of curves as each height sample blends into the next.

Below is the same zoomed-in terrain sample using bilinear interpolation to create additional sample points across the surface.

HeightmapZoomWithBilinear

If written out to a full-size image, this would be 128000×64000 pixels, enough to create a reasonably detailed overworld at the same grid resolution found in RMB blocks. New sample points are created on the fly from existing data, and it doesn’t require any additional memory.

There’s still a problem however. Despite having nice continuous samples, the terrain is still quite boring. The next technique is to add some noise and break things up a little. I’m using a fast simplex noise generator to create small variations at ground level. Below is an example of noise overlayed with interpolated heightmap.

HeightmapZoomWithBilinearNoise

You won’t see it in the thumbnail, but if you click through to full-size image you will see small whorls of coherent noise added to the height data. Compare this with the blocky first image, and you can see just how much fine data has been mathematically inserted. This can be scaled to any grid resolution and tweaked as required.

Of course, this is just the beginning. The next step is to create real terrain chunks from this data and tune noise generation towards interesting-looking terrain based on climate data.

Before wrapping up, I will leave you with the following image of a small patch of terrain (equivalent to 2×2 RMB blocks, or 1/4 the size of a full city. I have noise turned up to show the kind of deformations possible.

TerrainChunks


Over the course of the next few weeks, I will continue building on this foundation, adding better texturing, cities, and climates into the mix.

Time & Space and More

Daggerfall Tools for Unity has good fundamentals. It can load any texture, model, sound effect, city, dungeon, season, and climate. It has weapons, skies, enemies, combat, building interiors, tons of editor options, and a solid API for reading anything else you need from Daggerfall into Unity.

The big missing piece right now is loading up the right city based on world position and automatically applying things like time of day and seasonal effects. Starting from 1.1, many of these additional extras will be included in the tools. This post talks a little bit about the new features with some technical bits thrown in.

If you’ve already used Daggerfall Tools for Unity, then you know it uses a singleton object called DaggerfallUnity as an interface and broker between Unity and the Arena2 binary data. There are several components attached to DaggerfallUnity for various tasks. In 1.1 you will find a couple of new components in the mix that bring proper time and space handling. These are PlayerGPS and WorldTime. Let’s take a look at PlayerGPS first.

PlayerGPS


PlayerGPS is fairly basic on the surface. It exposes two variables to manage a virtual player position anywhere in the Illiac Bay. The world map in Daggerfall is 1000×500 “world pixels”, with each “pixel” being 32768×32768 native units in size. This means the total world size ranges from 0,0 (bottom-left, or south-west corner of map) through to 32768000, 16384000 (top-right, or north-west corner of map) The numbers you see above (6782976, 9371648) are world coordinates for the city of Daggerfall.

At code level, PlayerGPS exposes more functionality. It can provide information about climate and politics, check to see if a location is present, etc. New static methods in the MapsFile class also provide the ability to move between different coordinate systems used by Daggerfall – such as longitude and latitude, world pixel, world coordinate, and location ID. The location ID is actually a special number derived from the longitude and latitude. It allows for any location to be looked up quickly via hash. PlayerGPS exposes this via lookup functions into a Dictionary collection.

To help support all this from editor and code, the internal DaggerfallLocation component (a self-assembling map layout for cities and dungeons) now hold additional metadata with locations.

Location Metadata

Most of what you need to know about a location is either in this metadata, or can be read from the API using this information as a starting point. The good news is that you don’t need to worry about any of this if you don’t want to. The toolset automates all of this for you in different ways. More on this shortly.

Next comes WorldTime. This component is an actual Daggerfall-styled Tamrielic calendar.

WorldTime

When you start a game, WorldTime starts counting the seconds using whatever timescale you have set. You can set timescale at 0.5 to make world time run at half speed, or at 100,000,000 to watch months flip by in moments. To make it easy to use, the individual time units are broken down in a very human-readable format (year, month, day, etc.).

This is far more than just a timer. WorldTime exposes real information about seasons, birth signs, month names, and so on. When coupled with PlayerGPS, it becomes possible to pinpoint the exact climate, season, and time of day for player position and make the world react as expected.

This means everything from rotating the sun through an animated sky, to making it snow, to setting the correct sky by climate and season, to lighting up windows at night, to turning street lights on and off. You’ve probably seen this video already, but here is WorldTime in full effect. You don’t see the seasons change, but that is in and working. If you let the simulation run long enough, seasons will roll by as expected.

You don’t need to do anything special to benefit from any of this. Just tick the new boxes below and the tools do the rest for you.

Time & Space Options

More automation will be added as the feature set expands.

Time and space aren’t the only new feature coming in 1.1. There are huge improvements to import speed and the beginnings of true world streaming, a feature scheduled for version 1.2. My goal for 1.2 is to allow you to walk around a fully streaming, fully time-automated world. For now though, world streaming is still in early testing stages, and looks a bit like this.

WorldStreaming

Each of these tiles represent a single “world pixel”. In this test, locations are streamed in around the player’s world position. As the player moves, new world pixels are read in or disposed as required.

In case you’re wondering, yes that actually is the entire city of Daggerfall on a single tile. All the models are rendered as normal, I just have the camera pointing straight down from a high position. The gray tiles will eventually be replaced by a simple terrain system, also scheduled for version 1.2.

You won’t have long to wait for all this stuff. The 1.1 release should be ready within the next week, and 1.2 (which I’m working on now) will only be a few weeks away. When 1.2 is ready you’ll be able to just drop in a few prefabs (or load a premade scene) and hit Play to explore the entire of Illiac Bay.

I’m very excited to get all this through to you as soon as possible.