Before moving on to equipping items, I thought it would be fun to show off the equipment dye system in Daggerfall Unity.
Classic Daggerfall uses a 320*200 pixel 256-colour display – or more specifically a Mode 13h display. Back in this era, bitmap graphics were typically a width*height byte array of indices into a 256-colour RGB palette. One of the coolest tricks available to graphics programmers at the time was to change index ranges to substitute colours, change brightness, animate textures, and so on. Daggerfall uses index changes and palette swaps to accomplish all of these tricks and then some – it would be possible to write a series on that subject alone. This article is just about changing dyes to re-colour weapons, armour, clothing, and how the old index swaps can be realised in a true RGBA renderer like Unity.
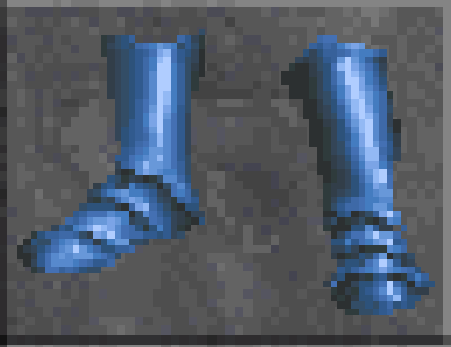
If all of that is difficult to visualise, let’s start with an example. Here’s a pair of basic boots without any changes.
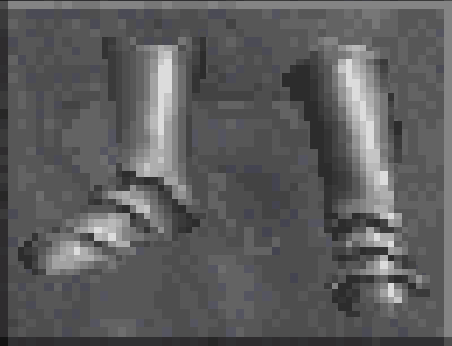
Every pixel above is just a single byte index into a 256-colour palette. For example, index 0x70 points to RGB #DCDCDC in the default texture palette for a very light grey. For weapons and armour, the 16 indices 0x70 to 0x7F are reserved for index swaps (clothing reserves indices 0x60-0x6F). In the case of these boots every pixel falls between 0x70-0x7F, but that isn’t true of all items. Sometimes only a small part of the image will support dyes. If we just substitute every index between 0x70-0x7F to another random index between 0x00-0xFF we get the below.
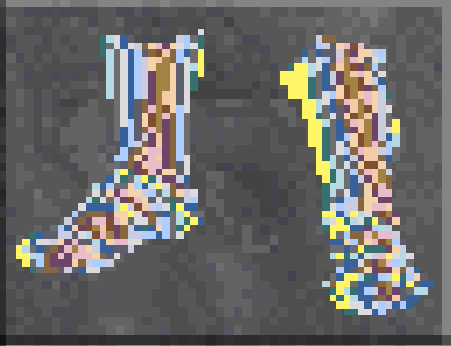
Quite the mess, but it demonstrates that changing indices can radically change the appearance of an indexed bitmap. The important thing to keep in mind is that every pixel is not by itself a colour. Rather its just an index pointing to a colour.
The first challenge in bringing indexed colours into Unity is that every time we read in a Daggerfall bitmap it must be converted to true 32-bit RGBA values where every pixel actually is a specific colour. Fortunately converting to 32-bit RGBA in Unity isn’t difficult. The general process is:
- Allocate a Color32 array with the same number of elements as width*height of source bitmap.
- For every pixel index in source bitmap, sample the RGB colour of that index to a Color32 value.
- Write colour sampled from palette into correct position in Color32 array.
- Create a new Texture2D of same width*height as source bitmap.
- Promote Color32 array to our Texture2D using SetPixels32() and Apply().
- Use this Texture2D as needed.
When it comes to changing the dyes, all that’s required is to substitute the correct indices in step 2 before sampling palette. So where do these colour swaps come from and how does Daggerfall know which swaps to use for what items? Daggerfall actually has a couple of different methods for generating swaps. Let’s start with weapons and armour.
Buried inside Daggerfall’s executable FALL.EXE at offset 0x1BD1E2 (for DaggerfallSetup version) are the metal swap tables. There is one 16-byte swap table per metal type. For example, when encountering index 0x70 for a Daedric pair of boots, replace 0x70 with swap index found at daedricSwapTable[0]. For index 0x71 replace with index found at daedricSwapTable[1]. And so on. These swaps have been known about for some time and you can find more details on this archived page from the wonderful old Svatopluk site.
Clothing does not appear to use pre-defined tables like metals. Rather, each swap table is just 16x sequential indices. For example, purple is 0x30-0x3F and green is 0xA0-0xAF. Swap tables can be generated on the fly using a dye enum mapped to starting index. Daggerfall appears to do this as these sequences are not found in the executable like metal swap tables.
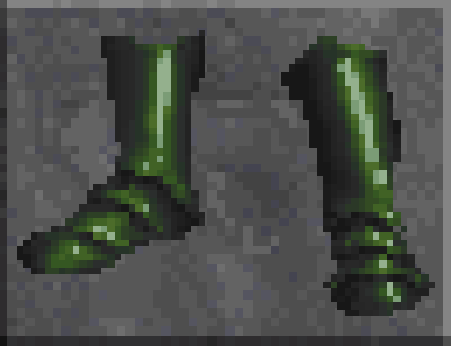
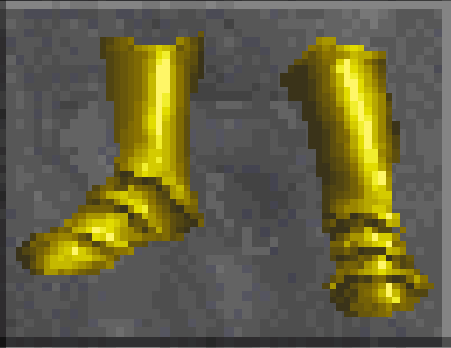
Armed with the power to create textures and swap indices, we can now generate our final boots image based on metal type. here are some examples.
Orcish
Dwarven

Daedric
One benefit of using the same generic process for metals and clothing is that it becomes possible to use clothing dyes on armour, something Daggerfall can probably do but doesn’t make available to players. This could allow for dye station mods down the road for players to further customise their equipment. With Unity using a true 32-bit palette this could extend well beyond Daggerfall’s 256-colours. Anyway, for an example of armour dyed something different:
Blue Chain Boots
The next challenge now that we’re using true 32-bit textures is a red pair of boots becomes a completely different texture to a green pair of boots. Whereas in Daggerfall the same bitmap can be used both times by just changing indices as described above in the software blitting function. Between this and the inherent (but minor) performance impact of converting indexed bitmaps to Texture2D, we need some way of minimising CPU time and garbage creation. Caching to the rescue.
Daggerfall Tools for Unity (the underlying API suite) already uses texture caching for general world materials, but items have their own set of problems to solve. To this end, I created a new item helper class to serve up equipment icons and handle the caching based on properties unique to items.
Every time an equipment icon is requested, a unique 32-bit key is generated by packing that request’s variables into a bitfield. The packing looks like below.
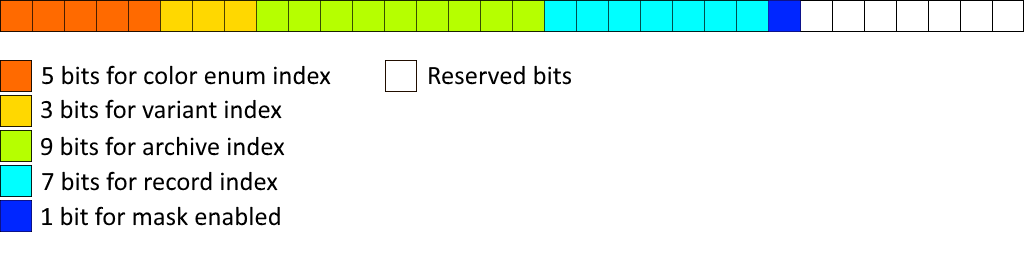
- Colour enum index refers to the swap table in use. This value matches Daggerfall’s own colour enum stored within base item templates.
- Variant index is an alternate image for this item.
- Archive index is the texture file number (e.g. TEXTURE.245) containing the icon.
- Record index is the icon index within the texture archive.
- Mask bit is used to enable/disable a special mask used to overwrite pixels like hair around helmets. More on this in a later post.
- There are a few reserved bits to grow the key system later.
It’s worth pointing out the end programmer doesn’t need to worry about how these values are packed. This all happens automatically under the hood when calling GetItemImage(). What matters is the API has a way of uniquely identifying any individual equipment icon based on its display properties.
When calling GetItemImage() the API will first check cache to see if this exact icon has already been converted from Daggerfall’s native file formats. If not, it is converted and stored in the cache for the next time its needed.
To wrap things up, here’s a new gfy showing a variety of dyed items in the inventory UI.
[gfycat data_id=”WetUncomfortableBetafish”]
For regular micro-updates on Daggerfall Unity, I can be found on Twitter @gav_clayton.
nice! I like the idea of having different materials for chain mail in a potential mod…